Manually Installing and Uninstalling Addons (Bindings) in openHAB 3
Eiko WagenknechtSometimes it’s necessary to install a different version of an openHAB addon (e.g., a binding) than what’s available in the official repository. This is particularly helpful when testing beta versions or for specific troubleshooting. In this article, I’ll describe the exact process for manually installing and uninstalling addons in openHAB 3.
Table of Contents
Required Materials / Licenses
- Raspberry Pi (e.g., the Raspberry Pi 4 with 4GB RAM as a complete kit, approx. €95)
- A microSD card suitable for the Raspberry Pi, preferably with 16GB or more storage. In 2020 alone, I lost 5 inexpensive cards due to read/write errors and now only use the Samsung PRO Endurance 64GB (approx. €14).
Uninstalling the Old Version
I assume here that SSH access to the openHAB console has been enabled. If not, please refer to my article on openHAB 3 installation.
In this example, I’m installing a test version of the Homematic binding that was provided to me.
First, the old version needs to be removed. If the old version was installed from the web interface, this can be done easily through the web interface under Settings -> Bindings -> [Binding Name] -> Uninstall.
However, if the version was already manually installed, uninstallation must be done via the console. To do this, log in via SSH to the openHAB console (not to the operating system, which is also accessible via SSH in the case of a Raspberry Pi).

Now use the command
bundle:list | grep Homematicto identify the appropriate bundle. The important number is all the way to the left - that’s the ID. We can then uninstall it with this ID:
bundle:uninstall <ID>
Installing the New Version
After removing the old version, openHAB must be stopped. To do this, log in via SSH to the Raspberry Pi at the operating system level and execute the command
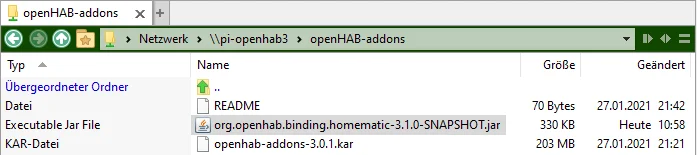
sudo systemctl stop openhab.serviceNow copy the .jar file of the new addon into the openHAB-addons folder:
If there’s still an old version present, delete it. After that’s done, clear the cache via SSH with the command
sudo openhab-cli clean-cacheand then restart openHAB with
sudo systemctl start openhab.serviceDon’t be surprised if this takes a while - on a Raspberry Pi 4, it typically takes a few minutes. Afterward, the system should be available again, now with the new version.
Important: If you have many addons installed and/or a slow Raspberry Pi (anything before v4), openHAB might not start up quickly enough and could get confused (resulting in strange errors in the logs). In this case, it helps to restart it once more right after the start with the command
sudo systemctl restart openhab.serviceand it should run smoothly again.
Conclusion
I’d love to hear your comments on whether this post was helpful. Feel free to write if you have questions or if anything remains unclear. Or if you were able to implement exciting automation projects building on this 🙂
No Comments? No Problem.
This blog doesn't support comments, but your thoughts and questions are always welcome. Reach out through the contact details at the bottom of the page.
Support Me
If you found this page helpful and want to say thanks, you can support me here.