Migrating Home Assistant to Raspberry Pi 5
Eiko WagenknechtMy Raspberry Pi 4 had been running at a rather high usual temperature of around 56°C, but yesterday, I faced some more severe thermal issues. The CPU temperature sometimes spiked above 75°C, and the Pi throttled itself to prevent damage. The case I used was not equipped to cool the Pi properly with the load Home Assistant and some Add-Ons put on it.
As I considered solutions, my ideas evolved: from simply getting a new case with fans, to also upgrading the Pi itself, and finally to switching from an SD card to an NVMe disk for improved durability and performance as well.
This post covers the migration process I went through.
Table of Contents
- The Original Setup: Raspberry Pi 4 with SD card and Add-Ons
- Choosing Raspberry Pi 5 Components
- Assembling the New Raspberry Pi 5
- Preparing the Pi 5 for NVMe Boot
- Installing Home Assistant OS on NVMe
- Data Migration: Restoring from Backup
- Final Configurations: Post-Migration Adjustments
- The Switch: Replacing the Hardware
- Conclusion
- References
The Original Setup: Raspberry Pi 4 with SD card and Add-Ons
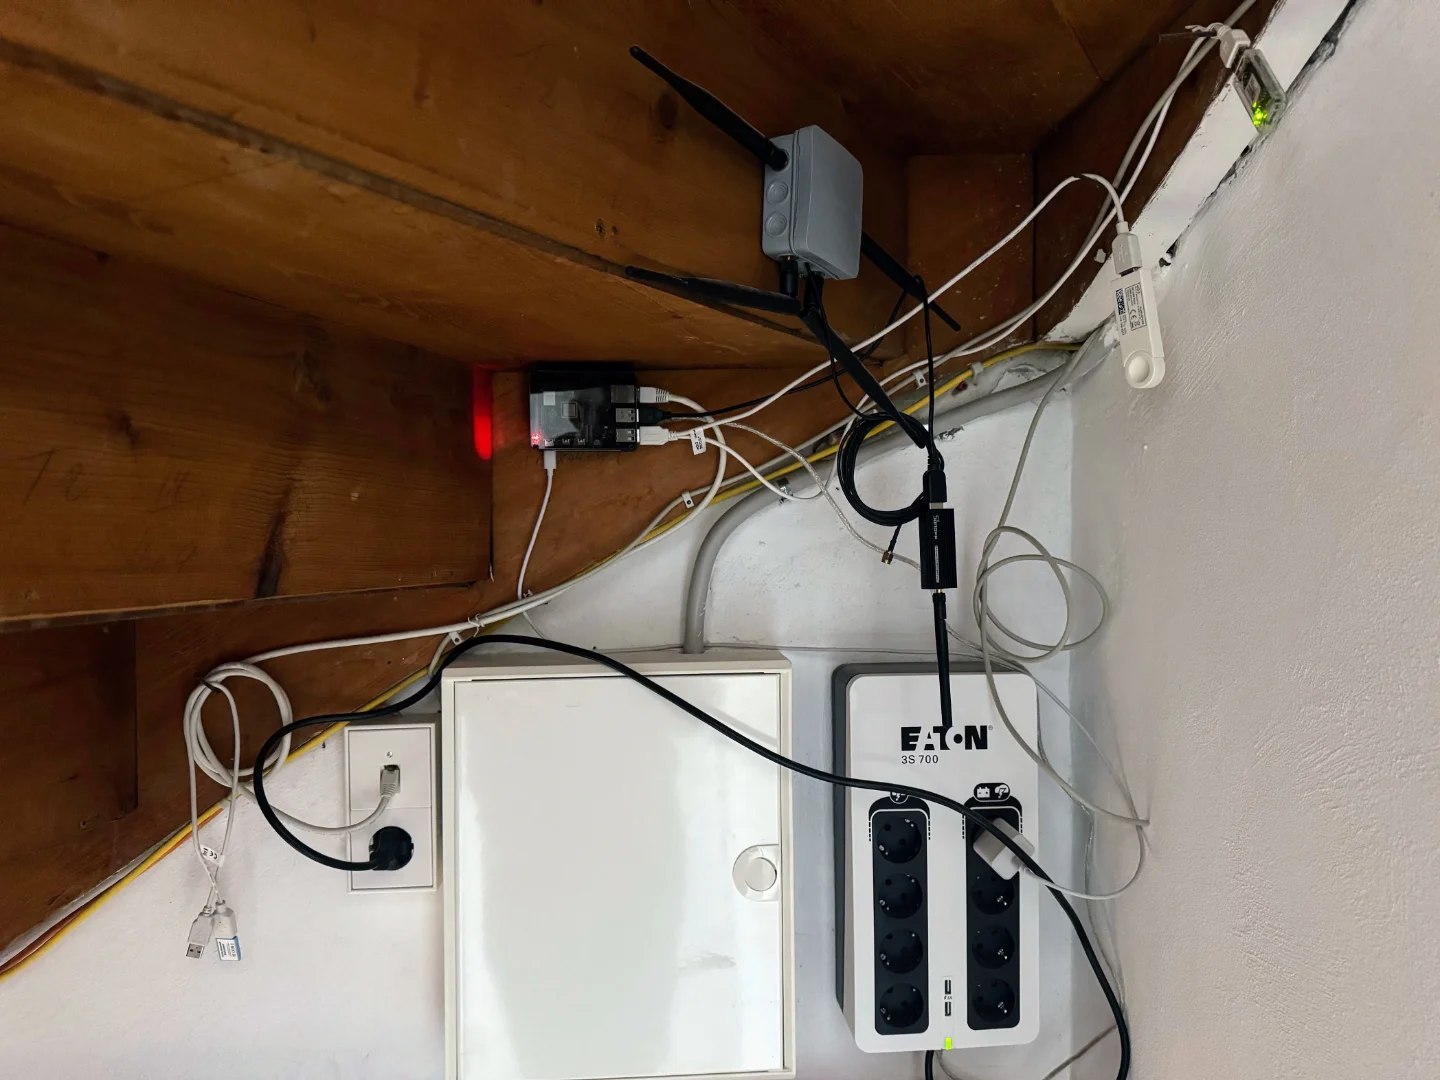
This was the hardware I used before:
- Board: Raspberry 4 (4GB) (affiliate link)
- Case: anidees AI-PI4-BB-H (affiliate link)
- SD card: Samsung Pro Endurance SD Card (128GB) (affiliate link)

There were four USB devices connected:
- USB 1: Sonoff Zigbee 3.0 USB Dongle Plus (affiliate link) as a Zigbee coordinator
- USB 2: Eaton 3S UPS (affiliate link) for power backup
- USB 3: eQ-3 HmIP-RFUSB (affiliate link) for Homematic communication
- USB 4: EnOcean USB 300 DB (affiliate link) for EnOcean communication
These were used by the following Home Assistant Add-Ons:
- Z2M (using the Zigbee dongle)
- Homematic CCU3 (using the Homematic USB stick and the EnOcean USB stick)
- Network UPS Tools (using the Eaton UPS)
When I installed these, it took me a while to figure out the appropriate device addresses and configurations for the USB devices. So, I wanted to keep the configuration mostly the same when migrating to the new hardware.
Choosing Raspberry Pi 5 Components
For better performance, I decided to go with the Raspberry Pi 5. I chose the 8GB version because it was only a few bucks more expensive than the 4GB version, and my previous Pi was already swapping sometimes. For my SSD choice, I went with the Kingston KC3000 NVMe disk, the same one I have in my desktop PC (which has been working great), only in 512GB rather than 2TB. 512GB capacity was still way more than needed for the operating system and my Home Assistant data, but had a good cost to capacity ratio.
- Board: Raspberry 5 (8GB) (affiliate link)
- Case: Argon NEO 5 BRED (affiliate link) + NVMe Addon (affiliate link)
- SSD: Kingston KC3000 NVMe (512GB) (affiliate link)
- SD: Any SD card with at least 8GB
Assembling the New Raspberry Pi 5
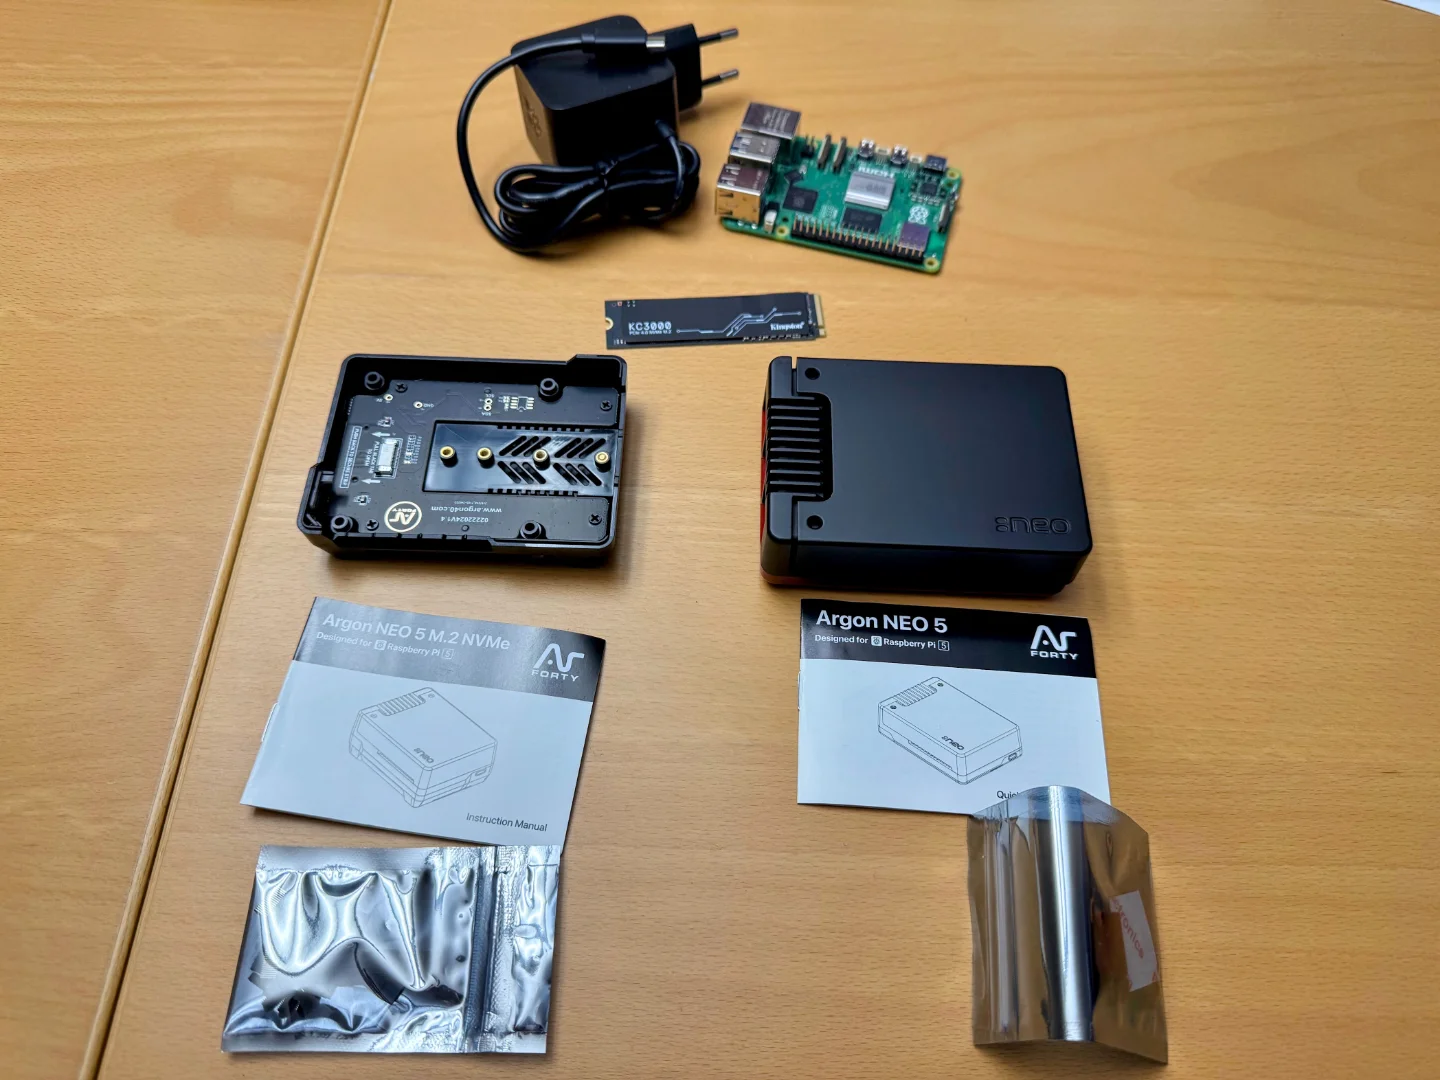
The new hardware arrived earlier today. This is what I got:

After unpacking everything, it looked like this:

Upon inspecting the Argon NEO 5 case, I was initially pleased to see it had the advertised wall mounts. However, installing the NVMe disk required swapping the base, which eliminated the wall-mounting option. This was rather disappointing as my previous setup was wall-mounted, and I had hoped to maintain that configuration. Consequently, I had to rethink the placement of my new Raspberry Pi setup.
For the assembly, I found a really fantastic video guide on YouTube, so I won’t go into detail here.
Preparing the Pi 5 for NVMe Boot
Once the hardware was assembled, the next step was to prepare the Pi5 for booting from the NVMe disk, where Home Assistant OS would be installed.
To do this, it was necessary to put Raspberry Pi OS on the SD card, update, and configure the EEPROM.
Flashing Raspberry Pi OS Lite
To start, I flashed the SD card with Raspberry Pi OS Lite (64bit) using the Raspberry Pi Imager, making sure to enable SSH access.
After flashing, I put the SD card into the Pi. With this case, this was tricky, because the NVMe disk was a little bit in the way. But with some fiddling, it worked.
Then I connected it via Ethernet (WiFi is not supported for HAOS, so I just used Ethernet from the beginning), connected it to a power source and booted it up.
After a few minutes, I SSHed into the Pi with the default credentials (user: pi, password: raspberry).
Updating the EEPROM
I ran the following commands to update the EEPROM:
sudo apt update && sudo apt upgrade -yThis downloads the newest EEPROM firmware (see release notes), but doesn’t update it yet.
I checked the current and queued EEPROM version with:
sudo rpi-eeprom-updateIt looked like this:
pi@pi-temp:~ $ sudo rpi-eeprom-update
*** UPDATE AVAILABLE ***
BOOTLOADER: update available
   CURRENT: Wed  5 Jun 15:41:49 UTC 2024 (1717602109)
    LATEST: Mon 23 Sep 13:02:56 UTC 2024 (1727096576)
   RELEASE: default (/lib/firmware/raspberrypi/bootloader-2712/default)
            Use raspi-config to change the release.
On the next reboot, the update would be applied, so I proceeded:
sudo rebootAfter the reboot, I checked the EEPROM version again; it was updated.
Now that the EEPROM was updated, I continued with the next step.
Configuring for Argon NEO 5 Case
To make the NVMe disk work with the Argon NEO 5 case, I applied some custom settings. There were two ways to do this: either by running a script or by manually editing the configuration. I’ll describe both ways.
Using the script
I installed the Argon NEO 5 script to enable the NVMe disk:
curl https://download.argon40.com/argonneo5.sh | bashManually editing the configuration
The script edits the config.txt and the EEPROM settings.
Both can be done manually as well.
If you want to do so, edit the /boot/firmware/config.txt by adding the following lines at the bottom:
[all]
dtparam=nvme
dtparam=pciex1_gen=3
max_usb_current=1dtparam=nvmeenables support for NVMe drives.dtparam=pciex1_gen=3sets the PCIe x1 slot to operate at PCIe Generation 3 speeds.max_usb_current=1sets the USB current to 1A. I’m not sure if this is necessary, but it’s in the script, so I added it as well.
Then set some custom parameters for the EEPROM:
BOOT_UART=1
WAKE_ON_GPIO=0
POWER_OFF_ON_HALT=1
BOOT_ORDER=0xf416
PCIE_PROBE=1BOOT_UART=1enables the UART ((Universal Asynchronous Receiver-Transmitter)) output during the boot process. It’s mainly used for debugging.WAKE_ON_GPIO=0disables the ability to wake the Raspberry Pi from a powered-off state using GPIO pins to save power and prevent unintended wake-up signals.POWER_OFF_ON_HALT=1configures the Raspberry Pi to fully power off instead of just halting when it shuts down to save power.BOOT_ORDER=0xf416sets the boot order to boot from the NVMe disk or USB mass storage first, then from the SD card, and then from network.PCIE_PROBE=1enables the probing of PCIe devices during boot. It allows the bootloader to recognize and initialize devices connected to the PCIe bus, such as NVMe drives.
Installing Home Assistant OS on NVMe
The next step was to get HAOS onto the NVMe disk. This could be done by using a desktop PC, attaching the NVMe disk via USB adapter, and flashing the image onto it. Or with just the Pi itself, which was the route I took.
First, I checked if the NVMe disk was recognized:
lsblkIt looked like this:
pi@pi-temp:~ $ lsblk
NAME        MAJ:MIN RM   SIZE RO TYPE MOUNTPOINTS
mmcblk0     179:0    0 119.3G  0 disk
├─mmcblk0p1 179:1    0   512M  0 part /boot/firmware
└─mmcblk0p2 179:2    0 118.7G  0 part /
nvme0n1     259:0    0 476.9G  0 disk
I downloaded the HAOS image and flashed it onto the NVMe disk (using the current release version):
wget https://github.com/home-assistant/operating-system/releases/download/13.1/haos_rpi5-64-13.1.img.xzThen I extracted the image with xzcat and used dd to write it to the disk:
sudo xzcat haos_rpi5-64-13.1.img.xz | sudo dd of=/dev/nvme0n1 bs=4M status=progressThen I rebooted to start from the SSD:
sudo rebootData Migration: Restoring from Backup
After a few minutes, I checked if the Pi was reachable and then opened the web interface in the browser: http://homeassistant:8123
I found that using the onboarding page to restore a backup was not effective, especially for password-protected backups, because it outputted error messages to the console while spinning a happy loading circle. It took me an hour to figure this out.
Fortunately, only the onboarding page’s restore process was broken. So I created a new Home Assistant user and logged in. The data didn’t matter, as I would restore a backup in the next step.
In the interface, I navigated to Settings > System > Backup and uploaded the backup file from the old installation. Then I performed a full restore.
This process took a while, depending on the size of the backup. Mine was around 400MB and included several Add-Ons. Uploading took a few seconds, but the restoration process took about 25 minutes with no feedback.
I monitored the process by constantly pinging the Pi. When it went down and came back up, I knew the restoration was done.
After restoring, I could log in with my old credentials and see my Home Assistant installation.
Final Configurations: Post-Migration Adjustments
The host SSH access was disabled, even though it had been enabled before. Therefore, to use it, I needed to enable it again.
Also, I had to set the hostname again on Settings > System > Network as it was not restored.
For my specific setup, I had to adjust one USB path. Inside the custom CUxD of the CCU3 Add-On I had to change the USB path from “1-1.4” to “3-2” because the USB ports were different on the new Pi.
The Switch: Replacing the Hardware
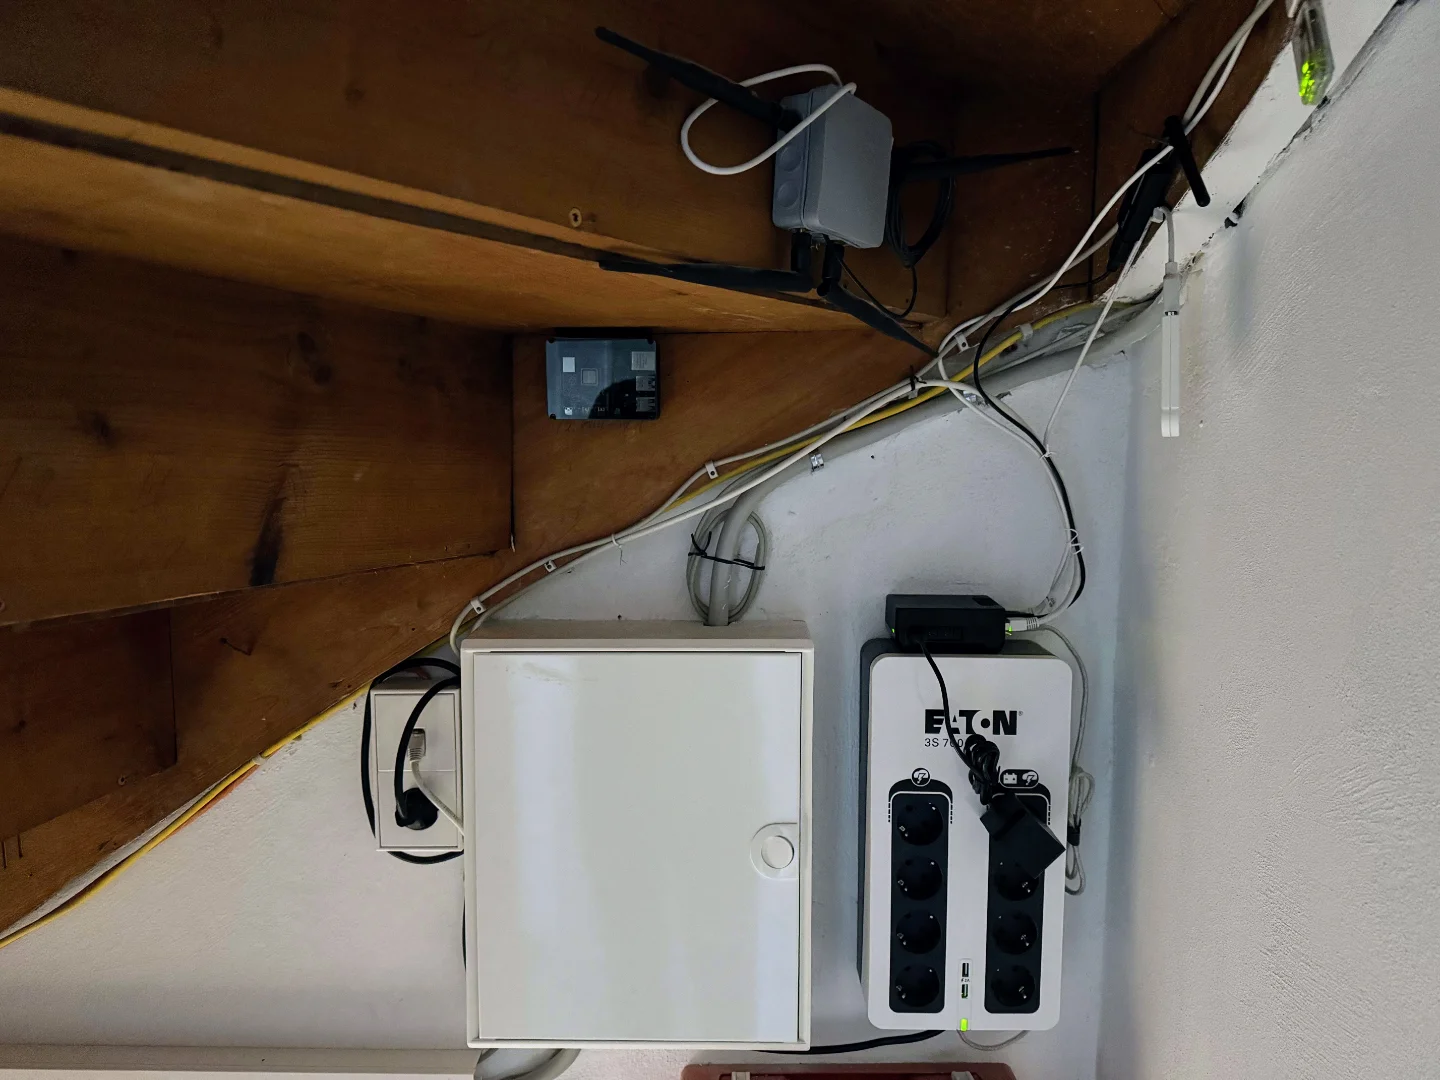
Then it was time to swap the hardware. I shut down the old Pi and replaced it with the new one, connecting all the USB devices. I placed the new Pi on top of the UPS and kept the old Pi for a while in case I needed to revert.

I made sure to update the DHCP reservation in my router to the new Pi, as needed.
Then I powered it on and waited a few minutes. Once the system was up and running, I performed a series of checks to ensure everything was working correctly. This included verifying that all my devices were connected, automations were functioning, and the system was stable.
And there it was, up and running smoothly, with a snappy response time.
Conclusion
The migration process was smooth overall. The most time-consuming part was the restore process, but that was mainly due to the broken onboarding page. The rest went smoothly.
The new Pi has been running well. The temperature is now around 42°C with the same load as before. The NVMe disk has been performing well, and the boot time is much faster compared to the SD card.
I’m thoroughly satisfied with the new hardware setup. The Raspberry Pi 5 with its improved processing power, coupled with the faster NVMe storage, has significantly enhanced the responsiveness of my Home Assistant system. The lower operating temperature also gives me confidence in the system’s long-term stability and reliability.
References
Some useful resources I found during the migration process:
- Argon NEO 5 manual
- Discussion about the setup process
- Raspberry Pi 5 Fan control
- Custom component the previous Argon series
No Comments? No Problem.
This blog doesn't support comments, but your thoughts and questions are always welcome. Reach out through the contact details at the bottom of the page.
Support Me
If you found this page helpful and want to say thanks, you can support me here.
