Remove deleted iPhone photos from Google Photos
(updated ) Eiko WagenknechtMy partner decided to clean up her photo library. She deleted hundreds of photos on her iPhone using the Picnic app. However, they remained in Google Photos, since Google Photos doesn’t sync deletions made on the iPhone.
Manually doing everything again in Google Photos would have taken forever. So, I came up with an automation. This automation saves significant time and effort.
It was challenging, because the Google Photos API doesn’t provide a delete endpoint. You can’t delete photos with the API. I had to find a workaround, which involved overcoming several technical hurdles.
My solution uses Apple Shortcuts, some Python scripts, the Google Photos API and a JS userscript. This combination makes it suitable only for the more tech-savvy users.
Here’s how it works.
Table of Contents
- Overview
- Step 0: Make a backup
- Step 1: Download scripts and set up environment
- Step 2: Set up access to the Google Photos API
- Step 3: Get a list of all photos from the iPhone
- Step 4: Get a list of all photos from Google Photos
- Step 5: Determine, which photos to delete
- Step 6: Preview the photos to delete
- Step 7: Delete the photos
Overview
My approach works like this:
- Get a list of the file names of all photos on the iPhone using Shortcuts.
- Do the same with Google Photos using the Google Photos API.
- Compare the two lists and note which photos are in Google Photos but not on your iPhone (i.e., those that were deleted on your iPhone). This is the list of photos you want to delete from Google Photos.
- Delete these photos from Google Photos by automatically opening the appropriate web pages with a Python script and then using Violentmonkey to click the delete buttons.
Step 0: Make a backup
Before you start, make sure you have a backup of all your photos. You can use Google Takeout to download all your photos from Google Photos.
This script will delete some photos from Google Photos and if they are the wrong ones, you will be very sad. There’s no undo button. You have been warned!
Step 1: Download scripts and set up environment
First, Python. I’ll use pip for this, but you can use whatever you like.
- In a terminal, create a new directory and navigate into it. Also create a
datasubdirectory. - Create a new virtual environment with
python -m venv .venv. - Activate the virtual environment with
source .venv/bin/activateon Linux or.\.venv\Scripts\Activate.ps1on Windows. - Install the required packages with
pip install google-auth google-auth-oauthlib requests. - Download the Python scripts and put them in the directory you just created.
There are multiple scripts, each building on the previous one, described in detail later.
Run them one by one (with python scriptname.py) to see if everything works as expected.
You also need to install the Violentmonkey plugin (or an equivalent like Tampermonkey or Greasemonkey) in your browser. I use Firefox, but it should work with Chrome just as well.
After installing Violentmonkey, you need to create a new script. Click on the Violentmonkey icon in your browser and then on “Create a new script”.
Replace the content with the content of the file userscript.js from the repository.
Save the script.
Step 2: Set up access to the Google Photos API
This step is a bit more complicated. You need to set up a project in the Google Cloud Console, enable the Google Photos API and create credentials. Here are the steps:
-
Go to the Google Cloud Console.
-
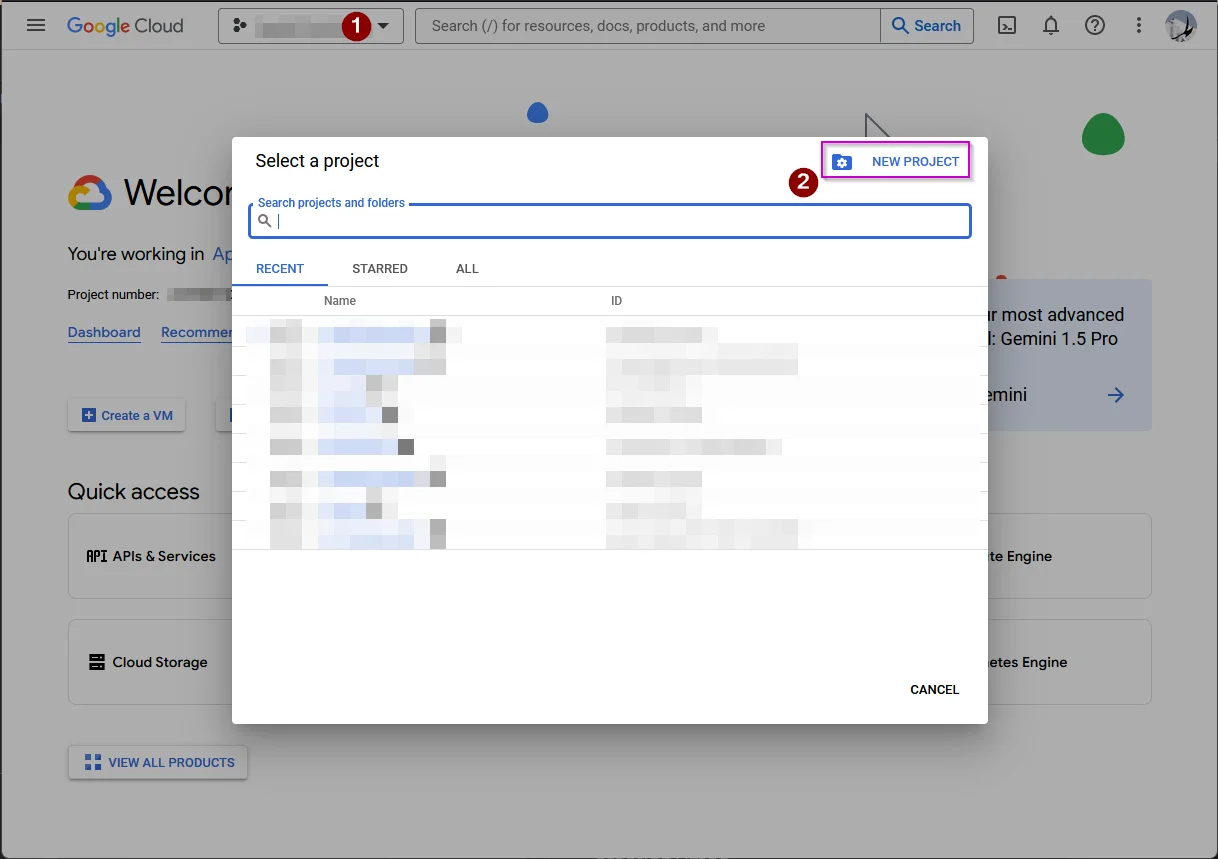
Click on the project selector, followed by “New Project”.
-
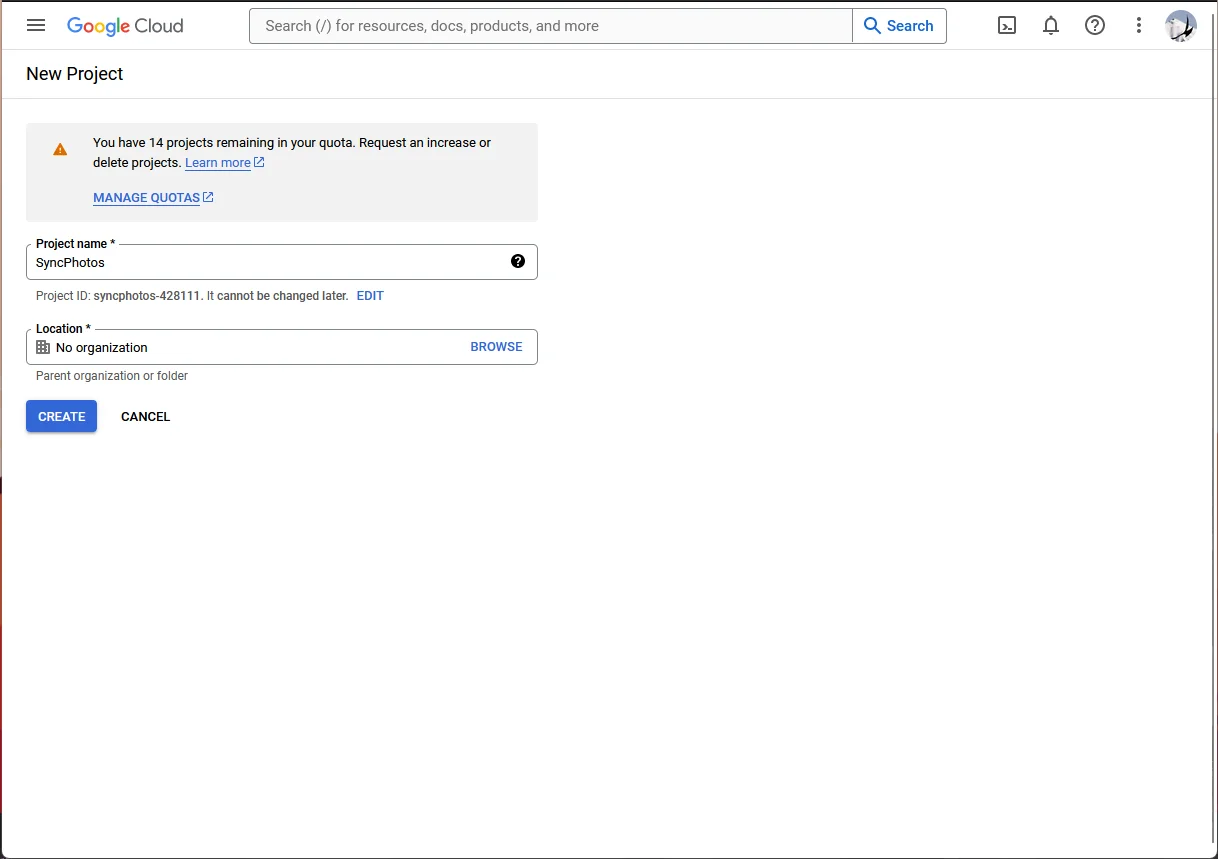
Enter a project name and click “Create”. I’ll use “SyncPhotos” in this example. After creation, you have to switch over to the new project.
-
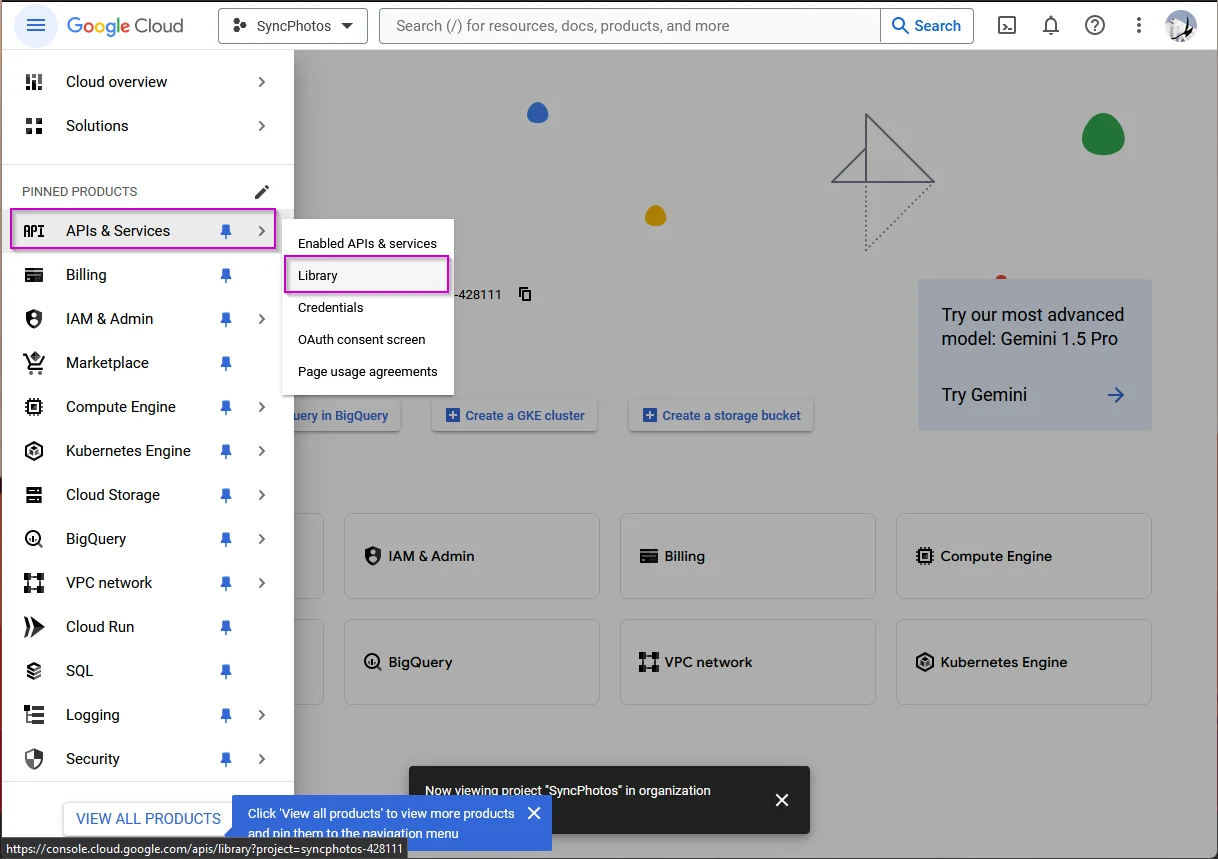
Click on “APIs & Services” > “Library” in the sidebar.
-
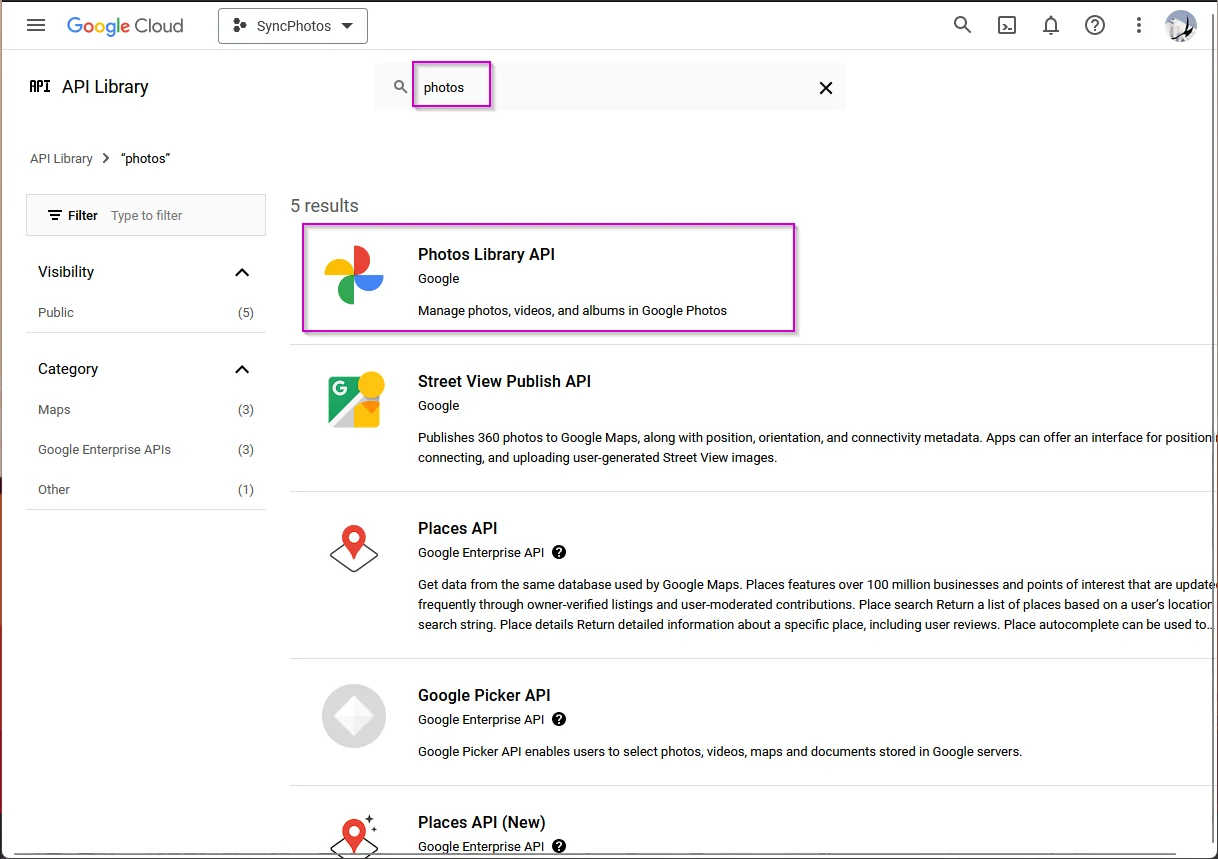
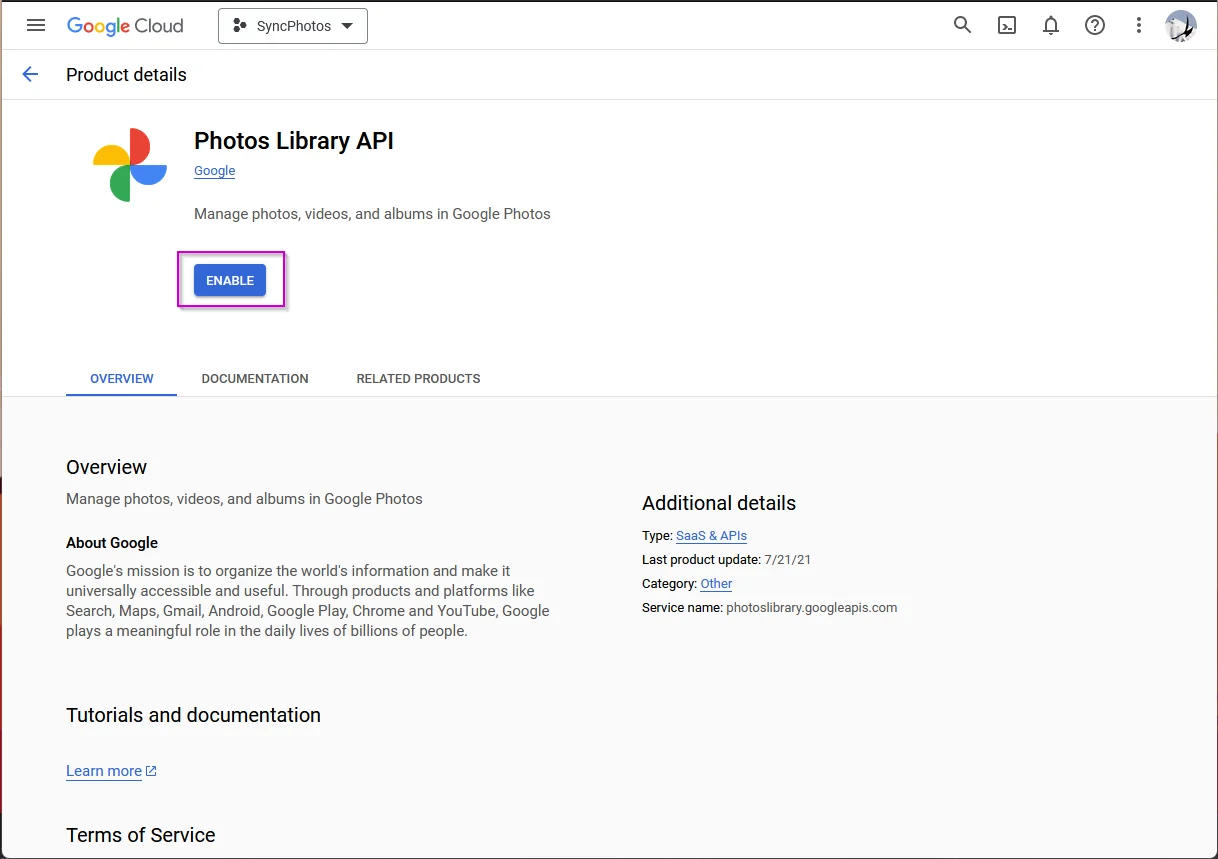
Search for “photos” and click on “Photos Library API”.
-
Click on “Enable”
-
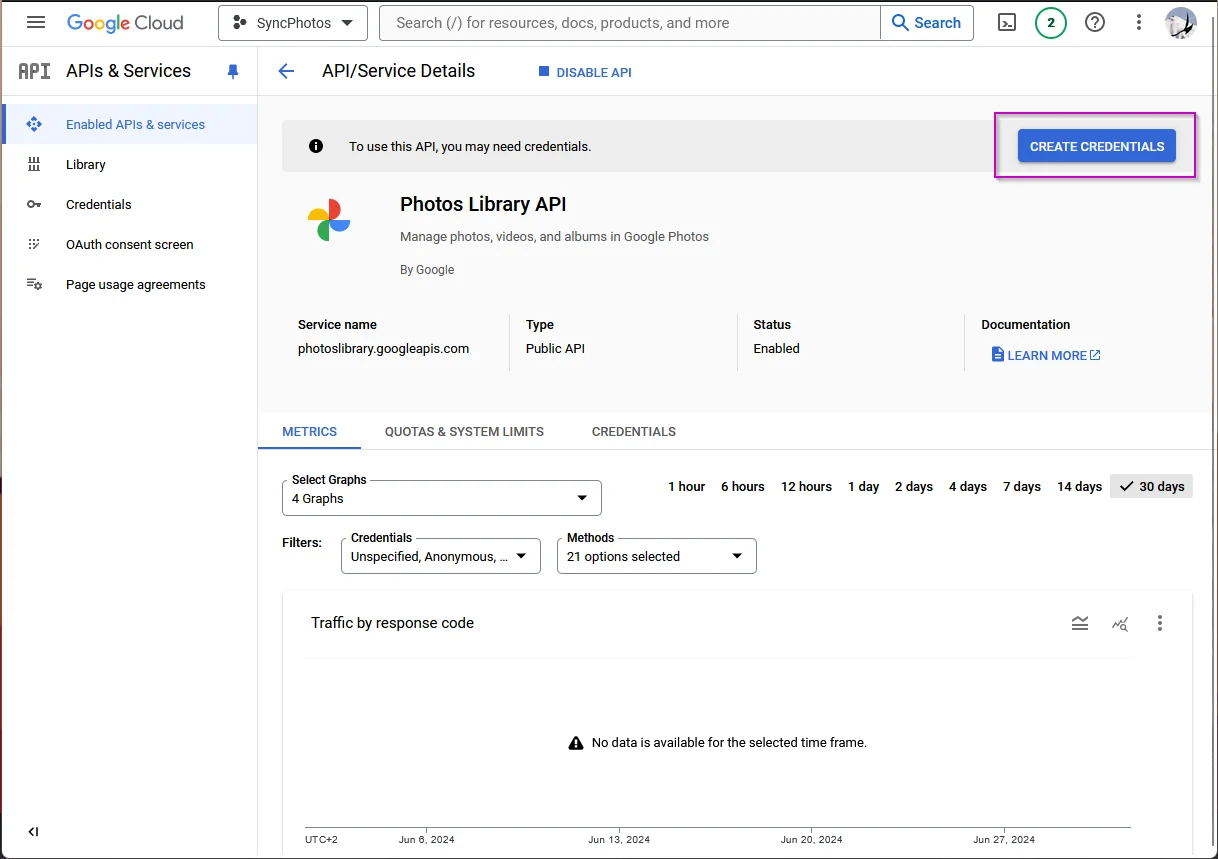
Click “Create Credentials”.
-
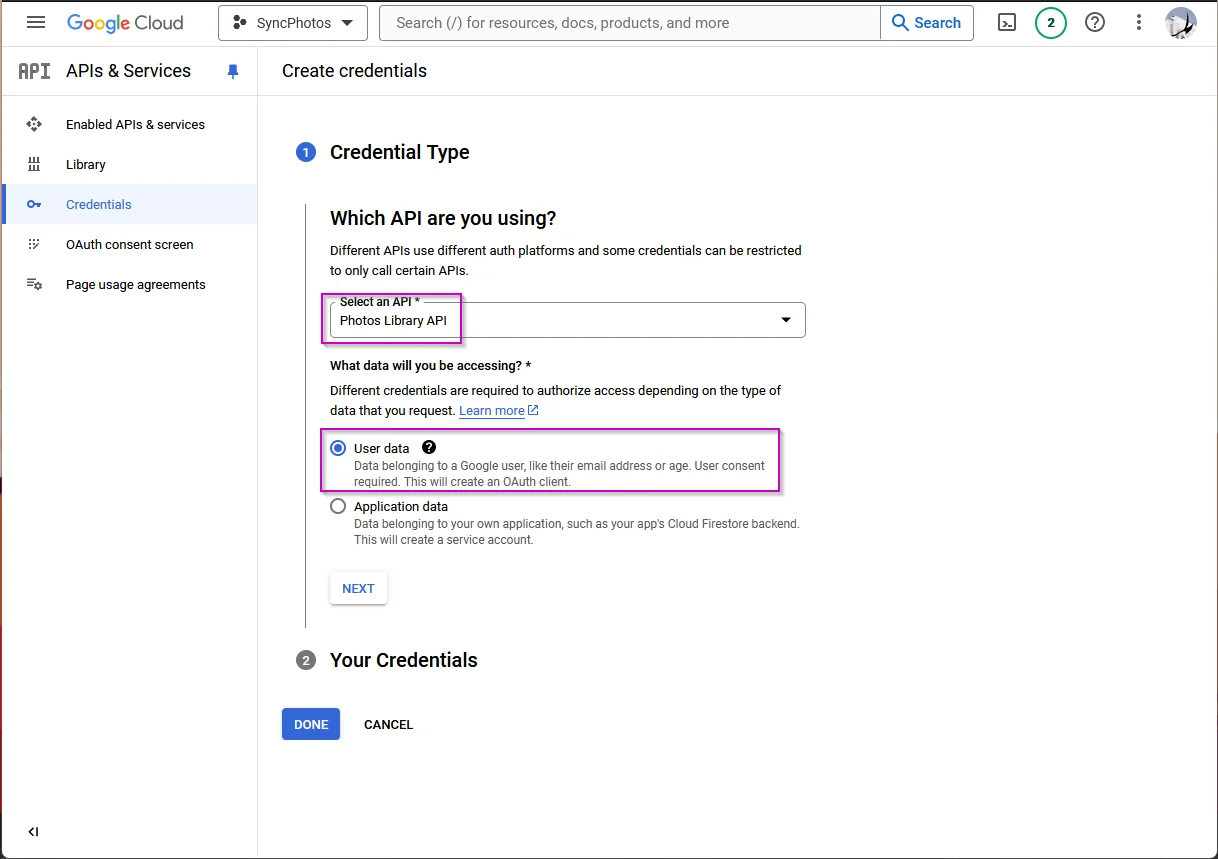
Select “Photos Library API” and “User data”.
-
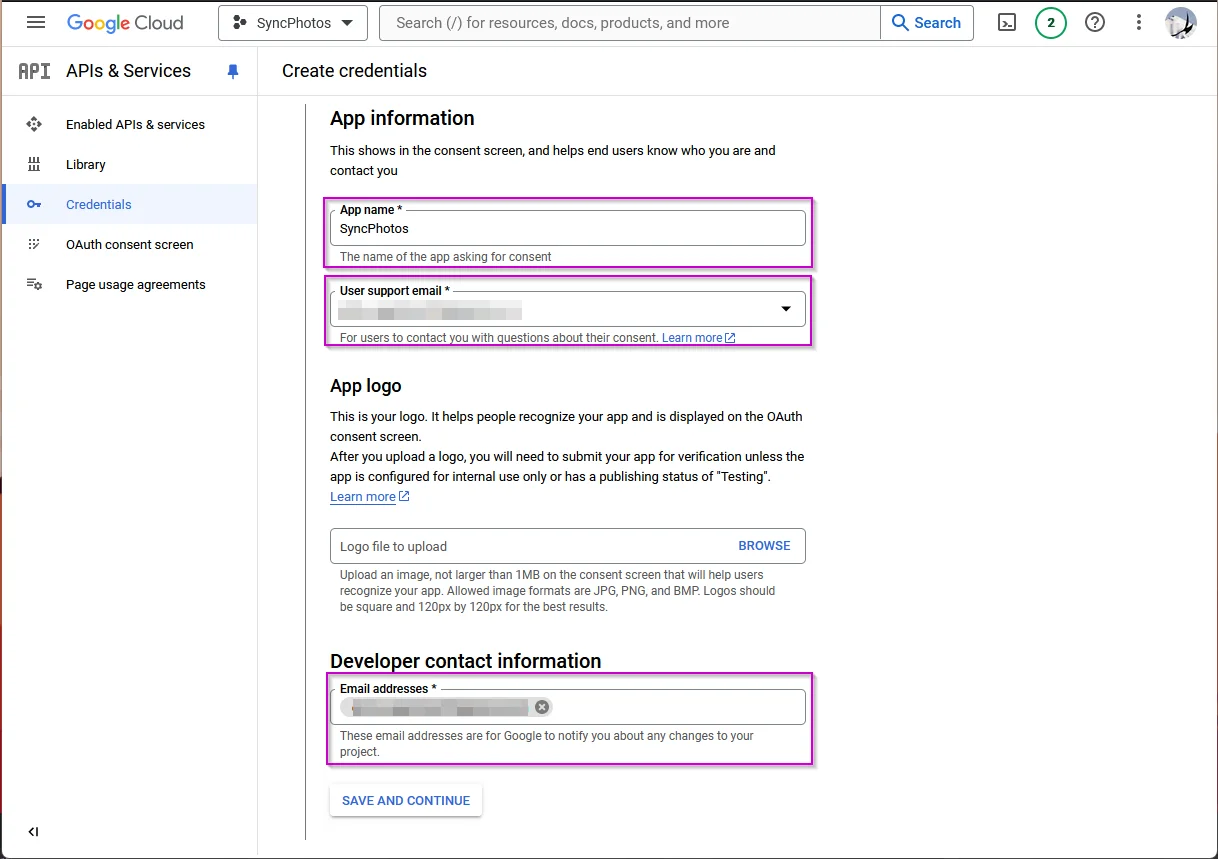
Fill in the required fields. The name can be the same as your project name.
-
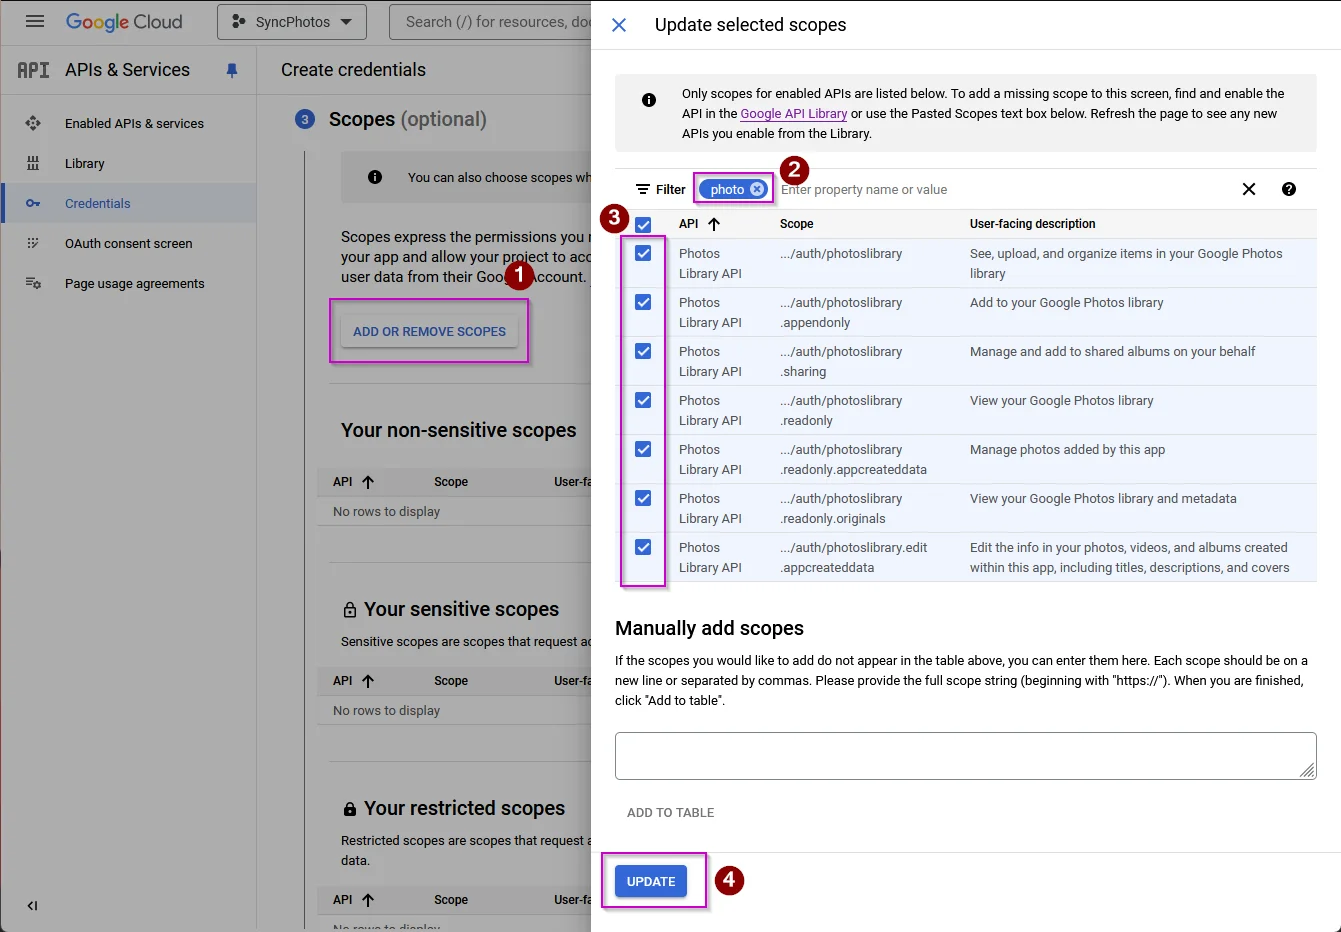
Click on “Add or remove scopes”, search for “photos” and add the scopes. You probably don’t need all of them, but I added them all for convenience.
-
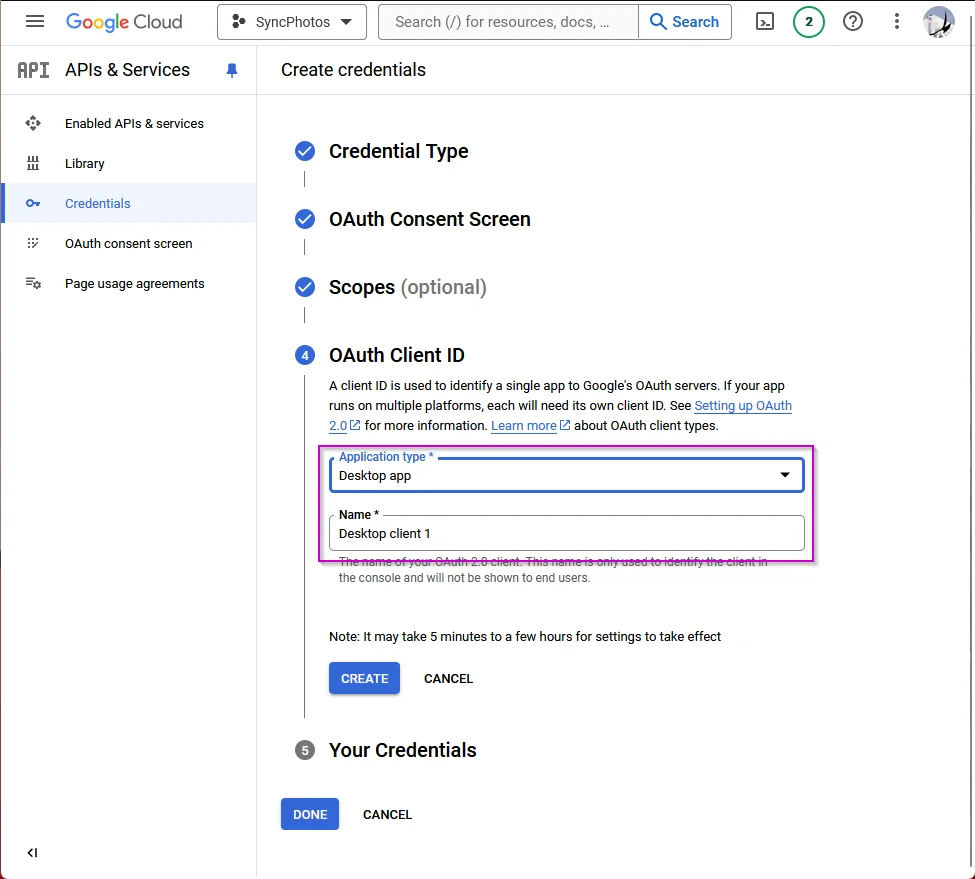
Click “Save”, then choose “Desktop app” as the application type and give it a name. The name is irrelevant. Then click “Create”.
-
Download the credentials as a JSON file with the “Download” button and save it somewhere. Save it in the
datasubdirectory and rename it toclient_secret.json.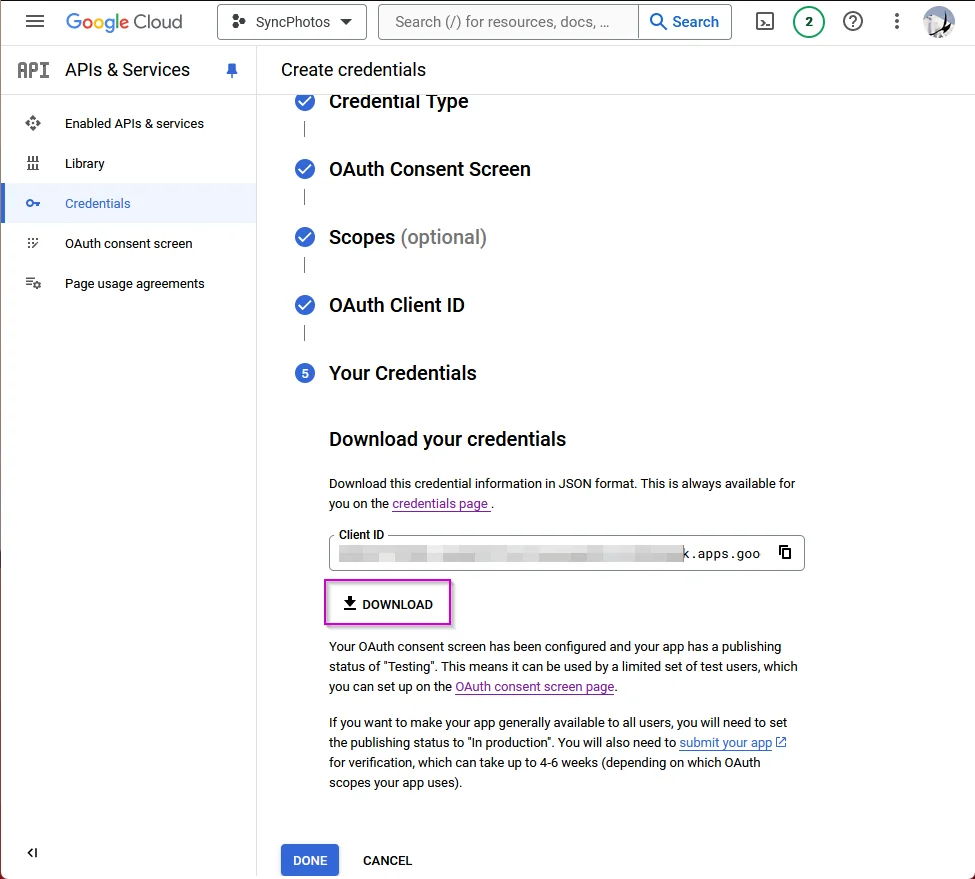
-
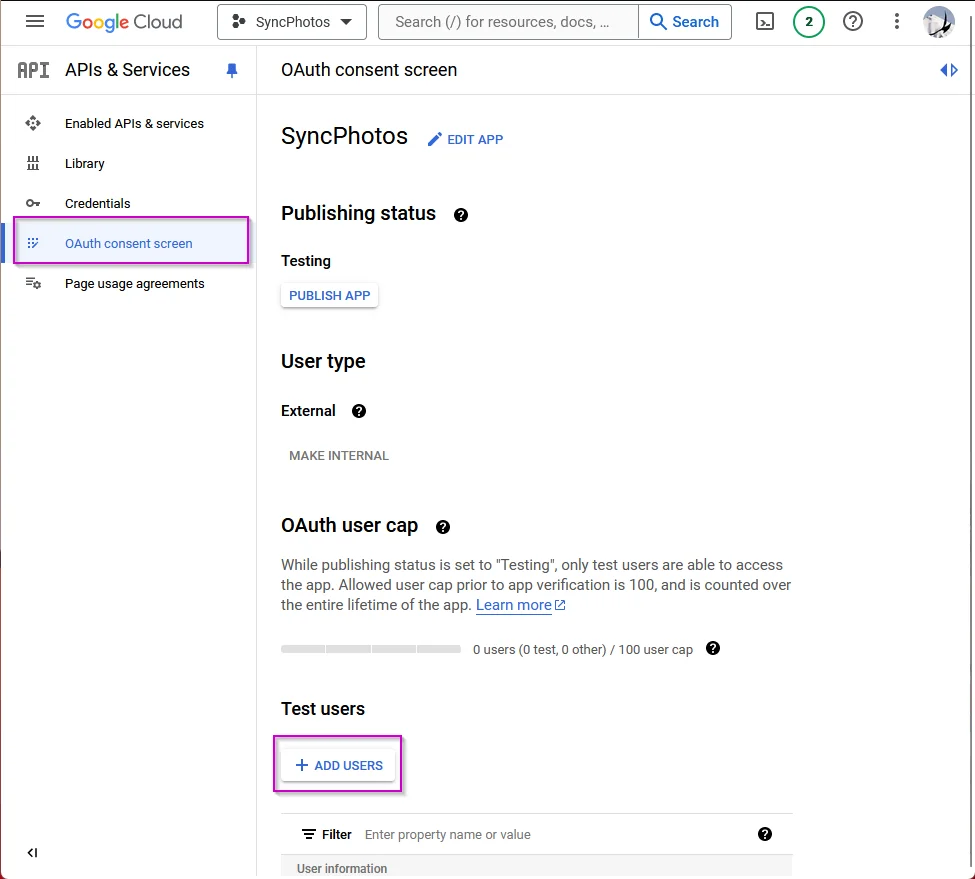
As a last step, you need to add your account as a test user because the app is not published. Go to “OAuth consent screen” in the sidebar and add your account as a test user.
Step 3: Get a list of all photos from the iPhone
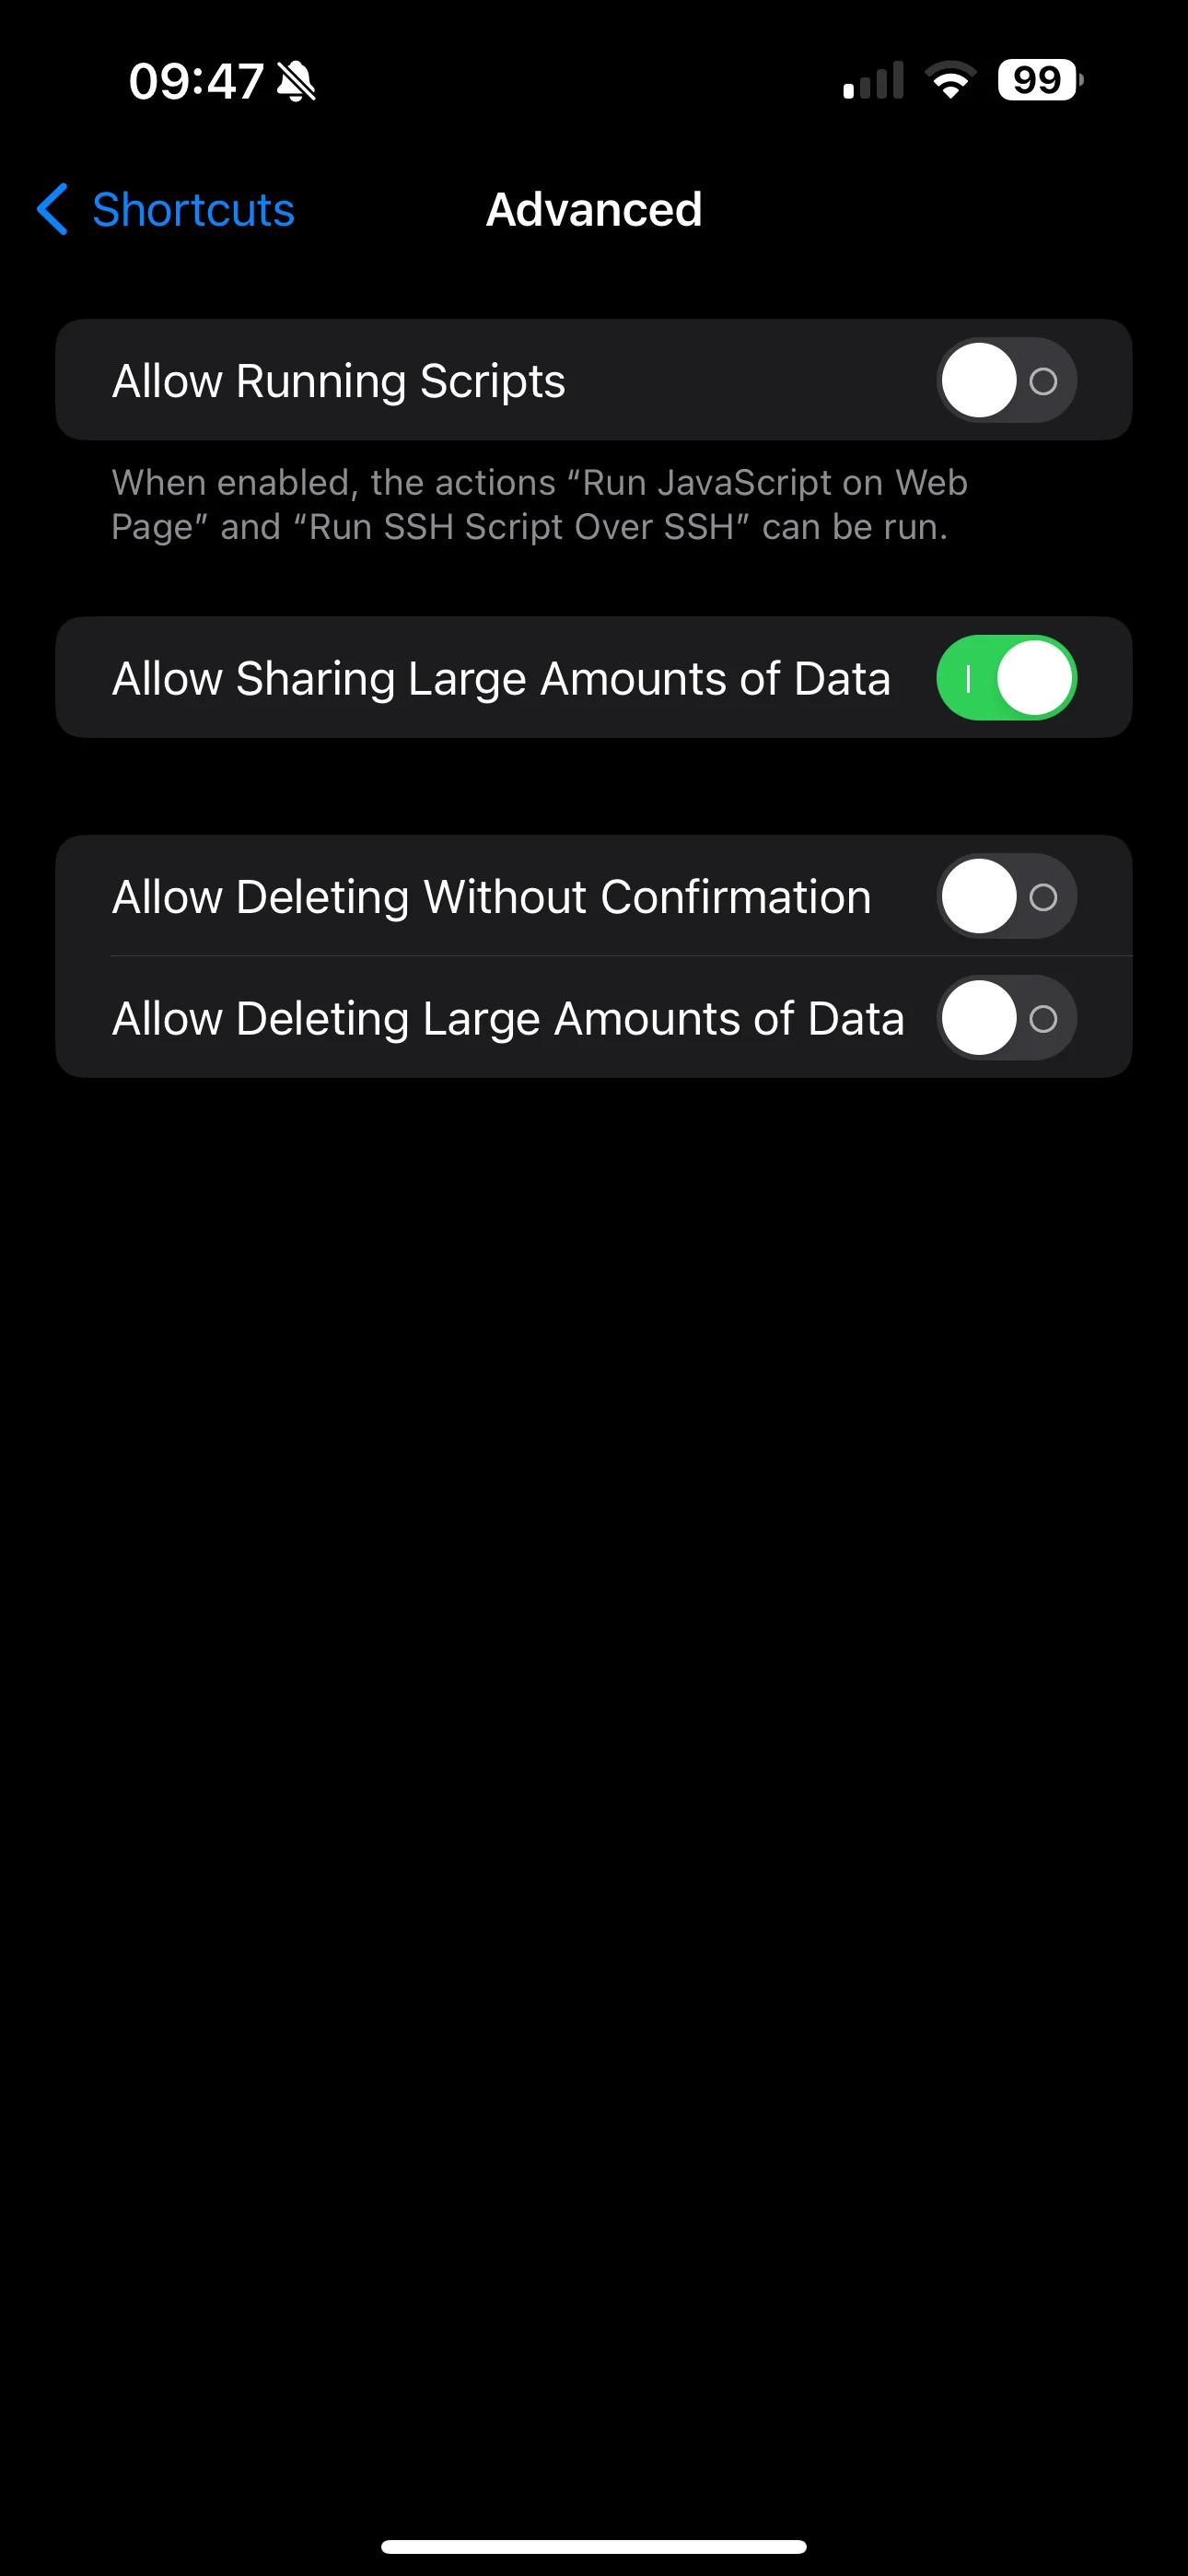
First, you need to go to Settings > Shortcuts > Advanced and enable “Allow Sharing Large Amounts of Data”. Otherwise, the script will only tell you that it can’t work with large amounts of data.
Then you can build the shortcut as follows:
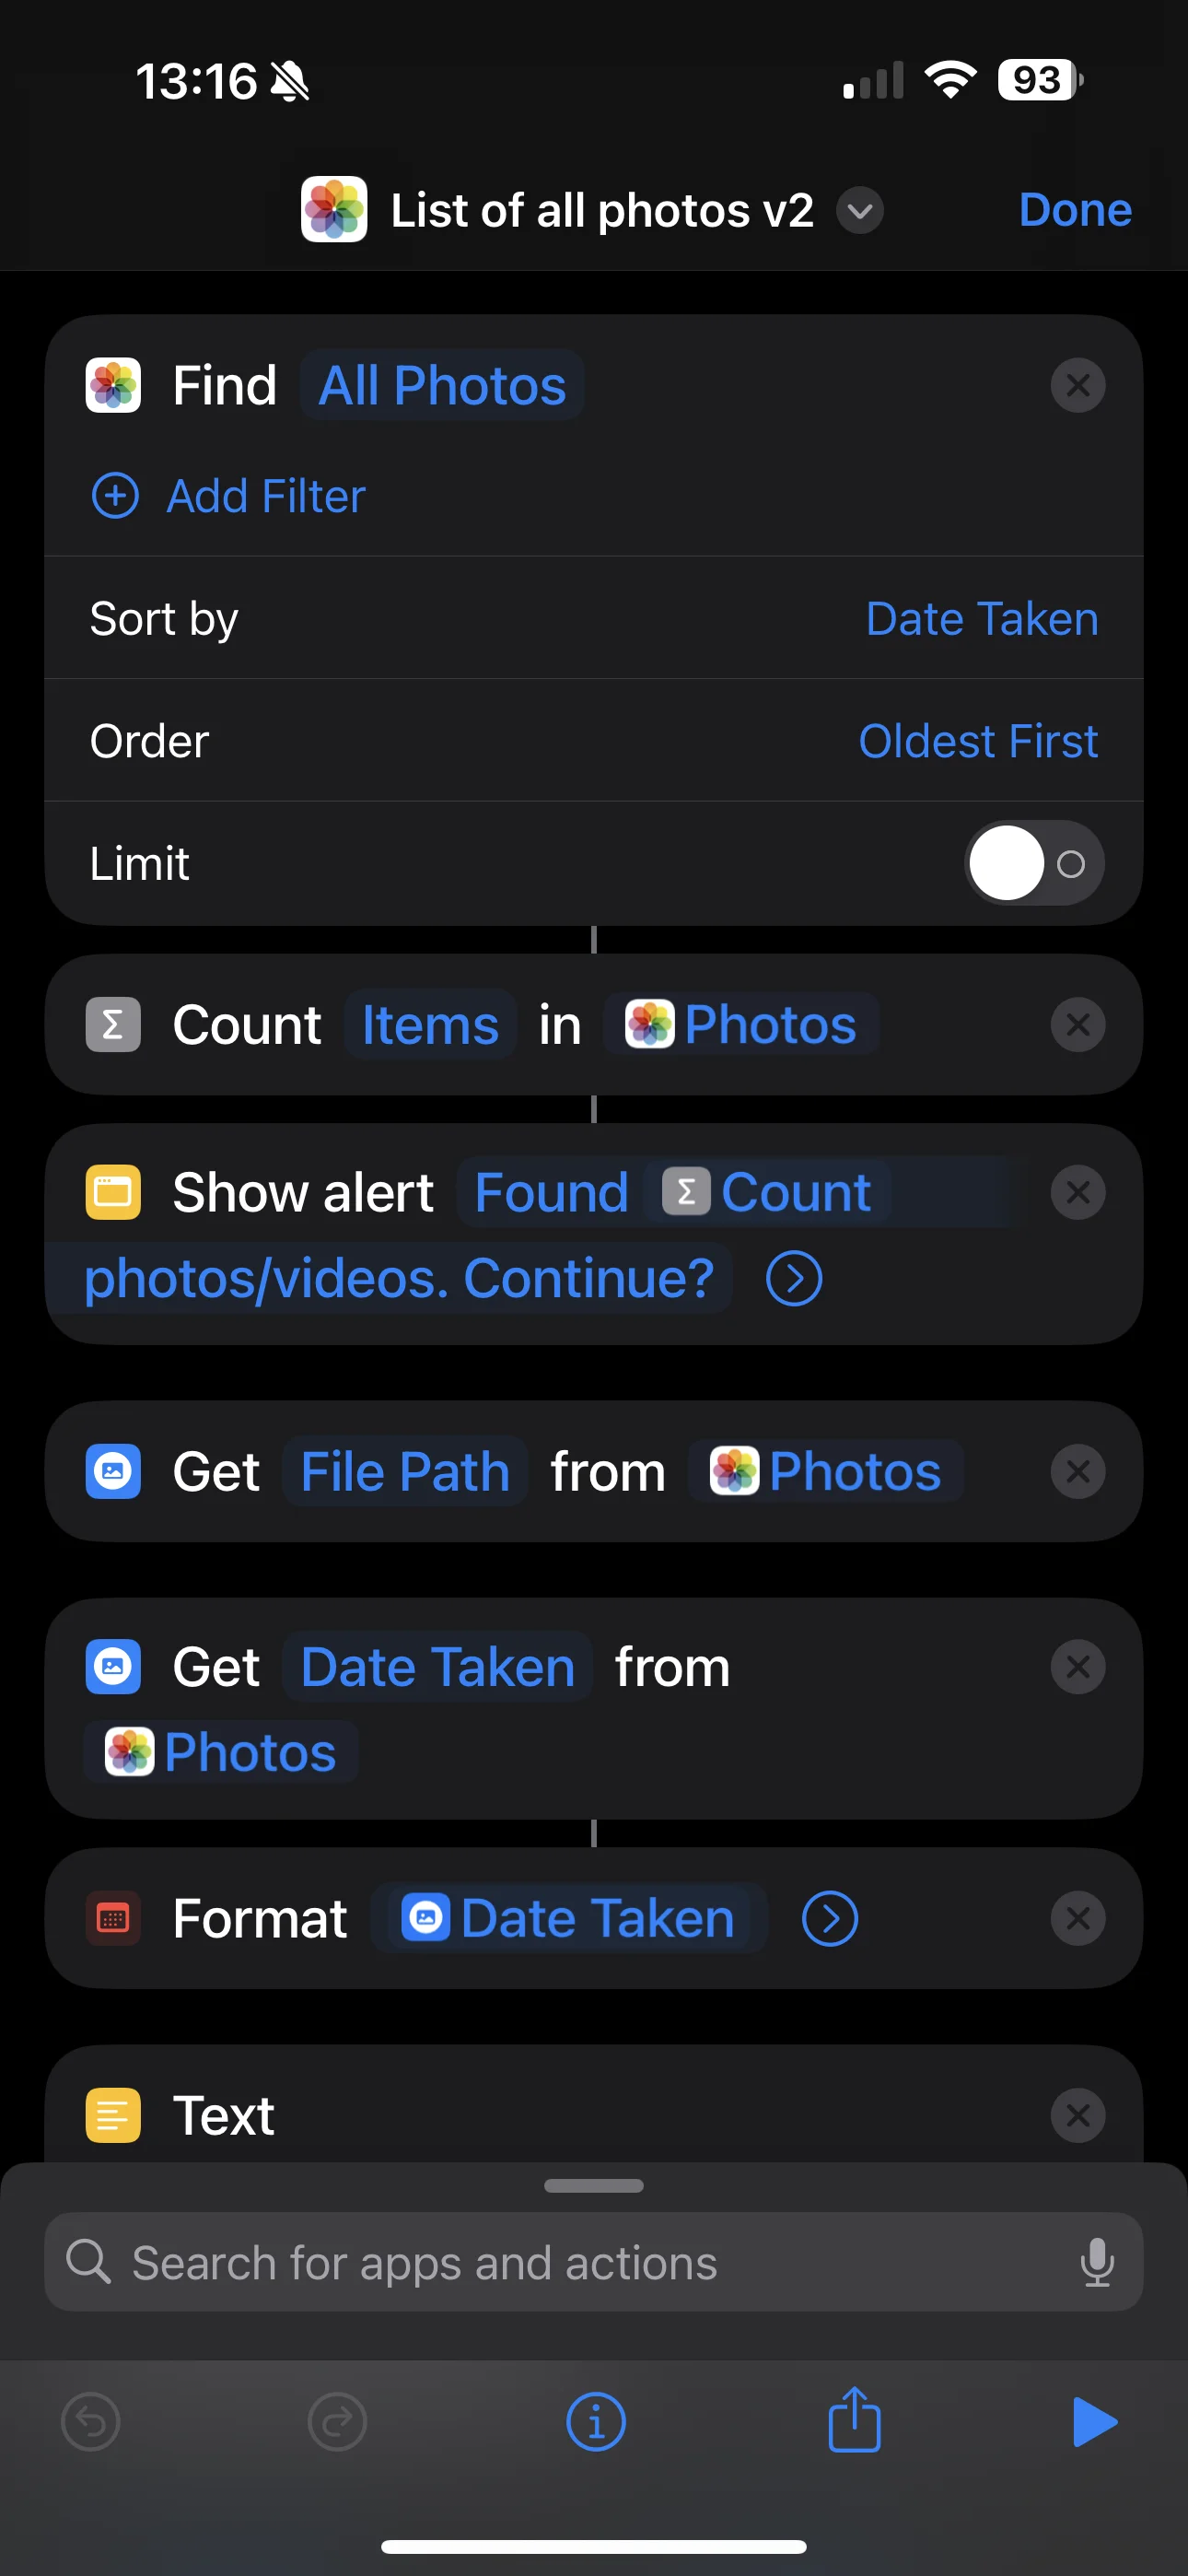
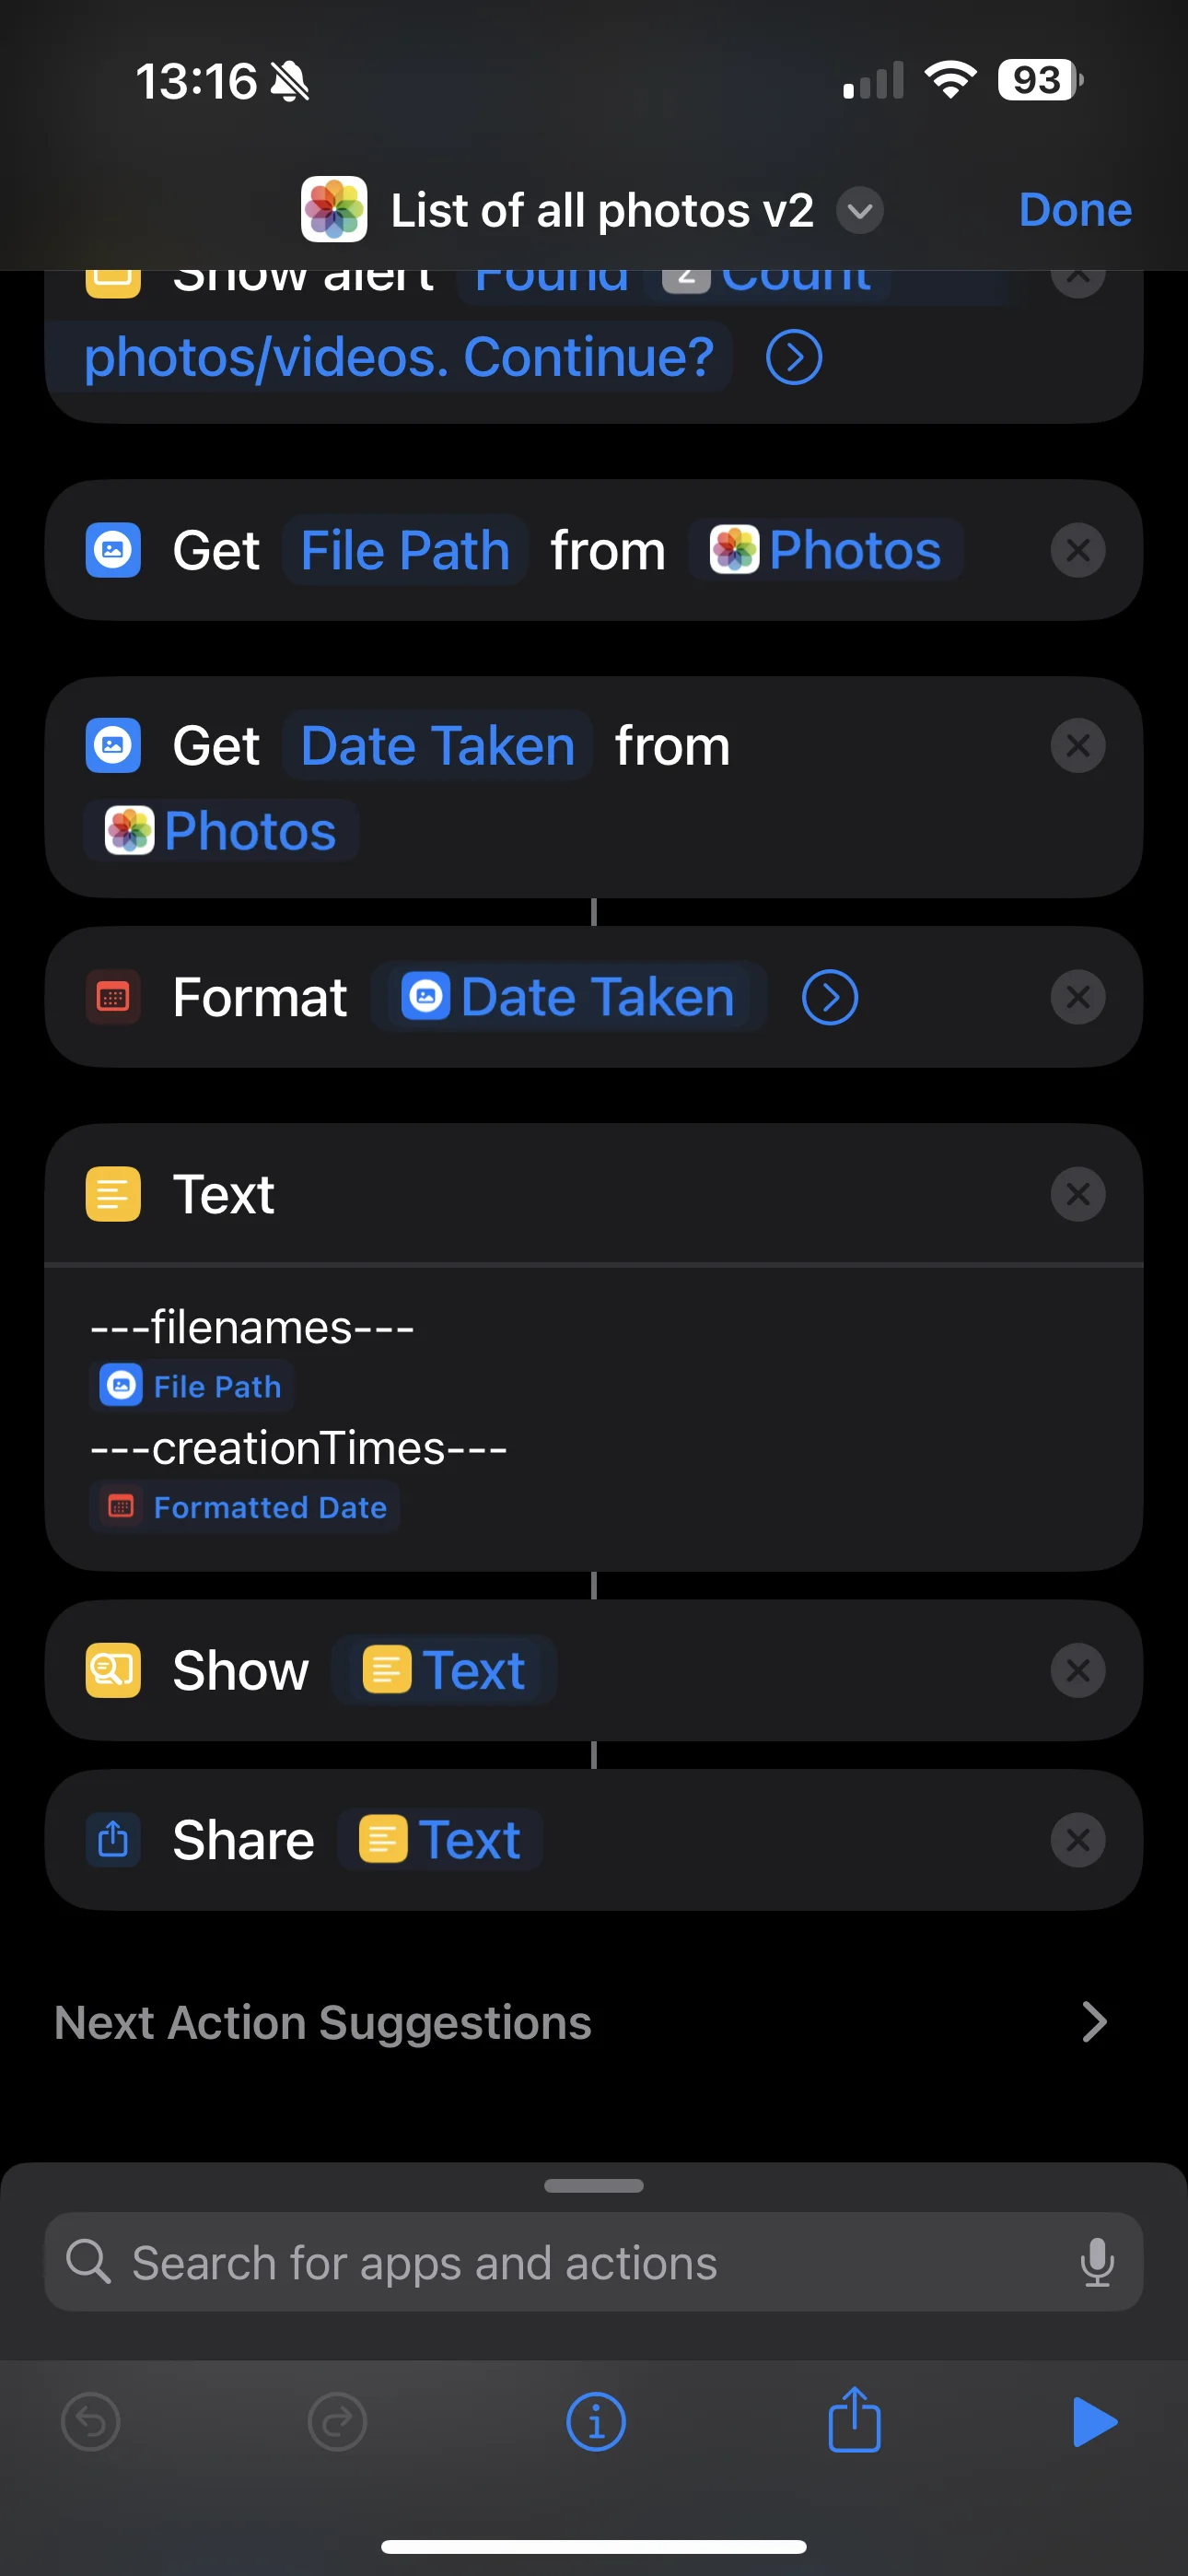
Or just download it here: List of all photos
Instead of using the “Repeat with each” block - it would have taken too long - I do two loops: one for the file names and one for the creation dates. The order is the same, so it can be easily converted to something more sensible later.
Running this can take quite a while, depending on the number of photos you have and the processing power of your iPhone.
To begin, it will show you how many photos it will process and at the end, it will open the system share menu with the list of all photos. You can use whichever method you like to get the list to your computer. I saved it as a text file which I then sent to myself via Telegram and downloaded it again there.
Save this file as 01_iphone_export.txt in the data subdirectory you created in the previous step.
If you have a lot of photos, it might error out. If it does, you can try to run it only for a part of your photos. To do that, edit the “Find all photos” block and set a date range. If you do this, you will later have to merge the resulting csv files manually.
Now, on your computer, you can run the script 01_convert_shortcut_export.py to convert the export from Apple Shortcuts to a proper CSV format:
python 01_convert_shortcut_export.pyAs the result, you will get a CSV file data/01x_iphone_photos.csv.
Step 4: Get a list of all photos from Google Photos
Run the script 02_get_google_photos.py to get a list of all photos from Google Photos:
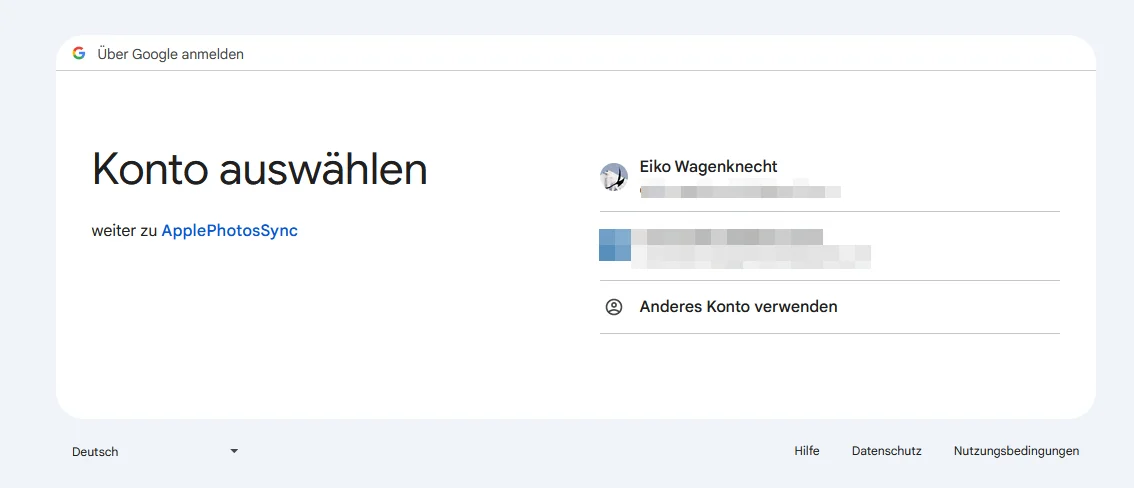
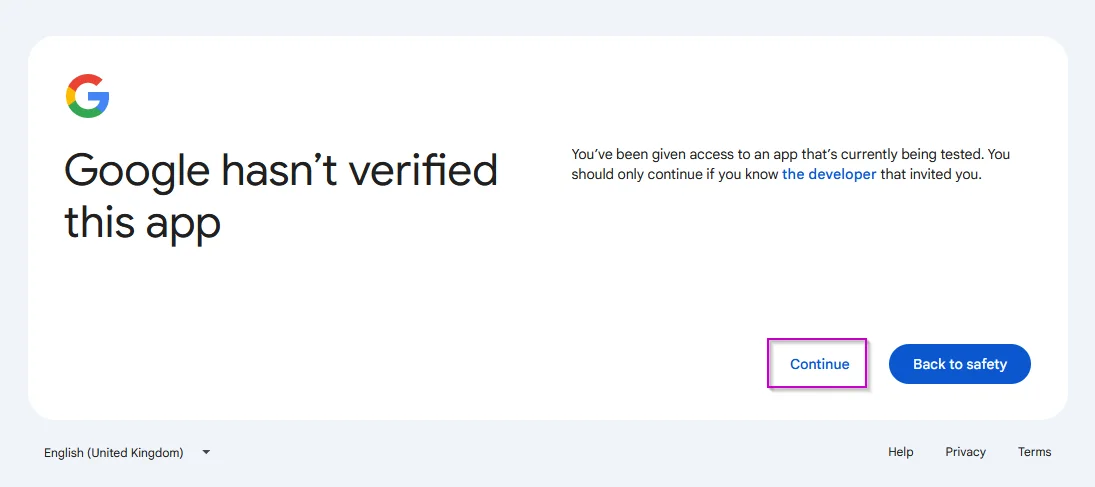
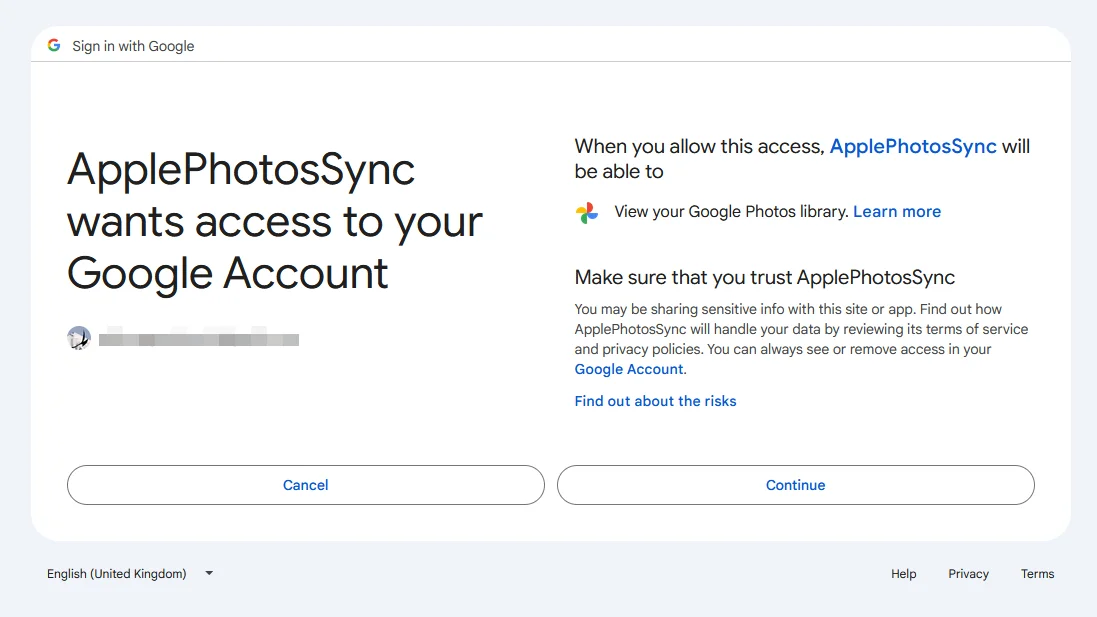
python 02_get_google_photos.pyThis will open a browser window to authenticate with Google. It will ask for permissions for the app project you created previously to access your Google Photos. Make sure you use the correct account.
This is what it should look like:
When it’s done, the script will grab a list of all photos in chunks of 100 (the limit of the API) and save the result to a CSV file data/02x_google_photos.csv.
Step 5: Determine, which photos to delete
Run the script 03_get_difference.py to compare the two lists and save the difference to a CSV (data/03x_photos_to_delete.csv):
python 03_get_difference.pyThis will compare the two lists and save the difference to a CSV file. This is the list of photos that will be deleted from Google Photos.
Step 6: Preview the photos to delete
Run the script 04_preview_photos_to_delete.py to show a preview of the photos to delete as an HTML file (data/04x_photos_to_delete.html). This is optional but highly recommended.
python 04_preview_photos_to_delete.pyStep 7: Delete the photos
Run the script 05_delete_photos.py to delete the photos from Google Photos. This is the final step and will delete the photos from Google Photos. Depending on the number of photos, this can take a while. The script will ask once again, if you are sure you want to delete the photos and then proceed by opening each photo in the browser. Violentmonkey will recognize the call using a url fragment, click the delete button and close the window again. The script will see when the photo is deleted and then proceed to the next one.
python 05_delete_photos.pyThis was more work than I thought it would be. However, it was a fun little project, and I enjoyed piecing together the different elements. I hope the resulting script helps you keep your photos in sync as well.
No Comments? No Problem.
This blog doesn't support comments, but your thoughts and questions are always welcome. Reach out through the contact details at the bottom of the page.
Support Me
If you found this page helpful and want to say thanks, you can support me here.
